
Research and Developement
Chess Pieces and Other Board Game Pieces
By Alex Bowen
Developement
TinkerCAD Design


Since I chose TinkerCAD to do my designing, I had to revive an old account. I created a project for this, and started building pieces from collections of basic polygons and community shared shape templates. I lined up their base dimensions to that of standard chess pieces, and let creativity go from there.
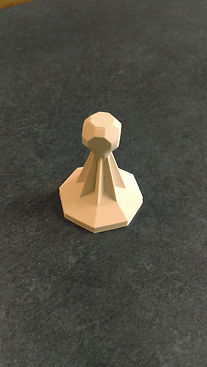
After the fiasco of the flopped Pawn production, I realized I needed to fix the underside of the top ball of the pawn so that it had a base it could form properly on the 3D printer. I also rethought the base and stalk dimensions.


The Knight proved most difficult to design, as it's the only asymmetrical piece. It might not be able to be printed on the school printer because it involves way too much printing without an underside base, meaning it will just fall out on the kind of printer we have. I don't think I could ever redesign it to work on a build-up style printer without it not looking like a knight anymore.

I refined some of the designs of the rook and bishop mostly for scaling, and finished up the knight design, although I plan on editing that massively later. None of the specifics here are too important.


The first production was fairly successful, but it found a major flaw with the production and design coordination. The printer is a drop liquid layer style printer, so if at any time an area does not have a layer directly beneath it, the liquid will simply drop right out and it will land wherever the nearest "ground" is. On my pawn, this was only slightly down in one small area, but it mucked up the design quite badly. It gave me a lesson on how to create future design, although I don't know how the knight will work like this.
The design came out quite nicely, with no major errors to speak of. There is still some slight smudging, but nothing a nail filer can't fix.


During an expo center display, the first iterations of the bishop and rook were printed out. However, they were too big, and I rescaled them right before the show so the correctly scaled models could print off while the exposition was going. The smaller pieces printed out nicely and are correctly scaled to the pawn. I didn't print the knight because I plan on redesigning the knight.
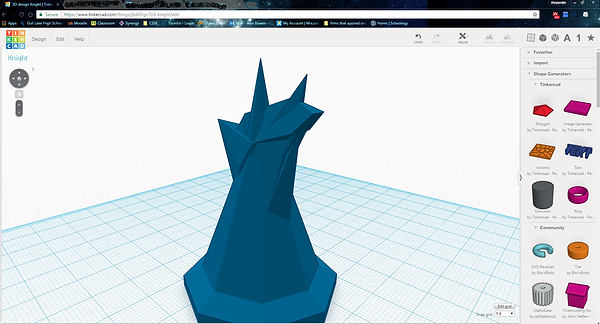
I decided it's time to completely redesign the knight in such a way that it will be able to print off. The result was without question the most intricate and difficult piece to build so far. I based the geometry on using a set of angled triangular and prismatic pieces to build almost flat surfaces that curve around into a shape that could almost be interpreted as a bucking armored unicorn's head.

While I finished the new knight design, I created a prototype queen. It has a crown, and I was not sure if it would print right.


The queen printed the next day, and despite a small flaw inside the crown, it printed nicely, even the jewels.

The next work day I finished the king design, and I incorporated a design specific I learned from the queen about spotty placement of items along a horizontal plane not working amazingly well.

The Triangular pieces arranged in a square-corner pattern were not some detailed visual feature, but rather connectors between the closely spaced out bottoms of the four large rising columns. This should prevent smearing between them during printing.
The printer was running nonstop with other projects, so I turned my efforts back to minor touchups on the rook design. I made it look slightly more fancy with a outward slant on the inner cutout.


After a week of waiting because of a busy printer, the king and knight were finally printed off. The king looks very nice besides a few straglies at the top I'll have to shave off, and the knight has a minor lumping on it's top that can also be shaved off with a little more work. The pieces are both final designs, they won't need any redesigning.